Good Morning,
Welcome to Front Porch Friday!
Today I have a project to show you using the file folders
from my Say Cheese! Front Porch Kit.
It's a Travel Pocket Book.
Not one that fits in your pockets but rather
a book that has pockets that will hold
those maps and tour books we collect on our travels.
In September 2010 I had the pleasure of taking a
childless trip with my husband. We hadn't taken a
childless trip with my husband. We hadn't taken a
vacation without kids in several years.
So this was a special treat.
So this was a special treat.
I had always wanted to go to Mount Rushmore, and that's
where we went. We packed up the minivan and hit the road.
From Texas its a long drive, so along the way
there are stops to make.
Inside right of my Pocket Book is an itinerary written on chalkboard paper.
I listed the main stops of our trip here. The Chalk Paper was perfect for
this because it's erasable and allowed me to add or delete if plans
had to be changed. The left side is a place to put
the confirmation papers and hotel receipts that we needed.

The outer pockets are holding my keepsake
maps and postcards. I also made a few extra large tags
that I used to keep my most favorite pictures of our trip.
(Sorry, no picture of those. IDKW)
maps and postcards. I also made a few extra large tags
that I used to keep my most favorite pictures of our trip.
(Sorry, no picture of those. IDKW)
I then tied them all up using the "SMILE" ribbon with a
Bingo Chip closure which are all included in
the Say Cheese! Kit.
Here is how I structured the book.
1. Cut a 1/4" section out of the middle of
Bingo Chip closure which are all included in
the Say Cheese! Kit.
Here is how I structured the book.
1. Cut a 1/4" section out of the middle of
the front and bottom folds of one file folder.
2. Crease folder so that the book will fold both ways.
3. Cut a second file folder into two sections making the
left side about 5-1/2". This is the section we will use for
our book. (Other side will be used in another project.)
4. Adhere the back side of the 1/2 pocket to the left back side
of the folded pockets with the full length of the smile ribbon
sandwiched between the pockets, and then start papering.
(make sure the ribbon is facing the right way before
permanently gluing folders together.)
Ribbon runs from inside middle to wrap around inside
pocket and continues around the outside pockets to
meet around front and hook on itself with
Bingo Chip, as shown above.
Isn't that a handy way to keep your souvenirs?

Project Two!
After completing my scrapbook pages and
Travel Pocket Book, I had a pile of scraps and pieces
and handmade this and that's. You know, those little things
that you think you want to use and then you don't.
So I sifted through the crafty rubble and put
together a little tag book.
This is my favorite project because it had no purpose
or direction and was completely free creative thinking.
Using the other half of the File folder from above book, I ran it
through my Big Shot Die Cut machine using tag dies of various
shapes and sizes. (Tags can also be free handed or cut using a paper
trimmer and a few corner punches.) These, mixed with the plain and
printed card stock scraps, made up the base of my tag set.

2. Crease folder so that the book will fold both ways.
3. Cut a second file folder into two sections making the
left side about 5-1/2". This is the section we will use for
our book. (Other side will be used in another project.)
4. Adhere the back side of the 1/2 pocket to the left back side
of the folded pockets with the full length of the smile ribbon
sandwiched between the pockets, and then start papering.
(make sure the ribbon is facing the right way before
permanently gluing folders together.)
Ribbon runs from inside middle to wrap around inside
pocket and continues around the outside pockets to
meet around front and hook on itself with
Bingo Chip, as shown above.
Isn't that a handy way to keep your souvenirs?
Project Two!
After completing my scrapbook pages and
Travel Pocket Book, I had a pile of scraps and pieces
and handmade this and that's. You know, those little things
that you think you want to use and then you don't.
So I sifted through the crafty rubble and put
together a little tag book.
This is my favorite project because it had no purpose
or direction and was completely free creative thinking.
Using the other half of the File folder from above book, I ran it
through my Big Shot Die Cut machine using tag dies of various
shapes and sizes. (Tags can also be free handed or cut using a paper
trimmer and a few corner punches.) These, mixed with the plain and
printed card stock scraps, made up the base of my tag set.

I made a little diorama scene using the metal bottle cap.
The cloud and bird were punched using a Fiskars punch.
The cloud and bird were punched using a Fiskars punch.
{Heart} My Camera with a film scrap leftover from the
Say Cheese LO and a chipboard camera.
A punched 1" circle from the red card stock
to make a flower using the satin cord for the petals.
"This is the Good Stuff" is a Polaroid caption on one of
the 12x12 printed papers. I loved the saying. I simply cut it out,
punched a hole in the top and tagged it.
A fabric covered piece of chipboard, from the ribbon
card in the kit, with the little sentiment found
on one of the papers.
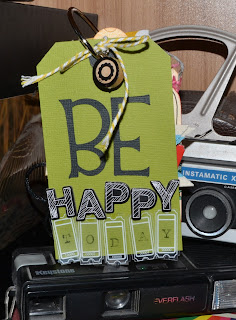
Here, I cut the "BE" using the Alphalicious Cricut
cartridge and black card stock. Thicker Letters to
spell "HAPPY" and stamped letters on clear tickets
to spell out "TODAY"! I added a small screw
eye to this bingo chip to turn it into a charm.
Hung it onto the tag with the bakers twine.
The only thing on these tags NOT included in the
Say Cheese! Kit was the book ring to hold the tags together.
But you could use any number of ribbons from the kit to
do that if you are out of book rings.
Now hop on over to the next DT member's blog
and see what their favorite kit item or project is.
Rhonda Merry: http://
Susan Tidwell: http://
Kristy Fey: http://
Valerie Bishop: http://
Lynette Chiles: http://netteart.blogspot.com/
Robyn Schaub: http://
Elaine Howell: http://
Tracy Pounds: http://
And our Guest Designer:
Leslie Ashe: http://
Kristy Fey: http://
Valerie Bishop: http://
Lynette Chiles: http://netteart.blogspot.com/
Robyn Schaub: http://
Elaine Howell: http://
Tracy Pounds: http://
And our Guest Designer:
Leslie Ashe: http://
Then go to the Little Blue House website to order your kit if
you haven't already. Only a limited supply left and they are going fast.
Thanks for joining me today.
Merry Crafting Everyone!!
Rhonda


These projects are so so fun!! Love the pockets and those tags are darling!!
ReplyDeleteLove the tag ring!!! Great Idea for using up your scrap pieces...I'm going to do this! Then use them here and there when I'm crafting or scrapping and need a little extra cuteness!!! Thanks for sharing!!
ReplyDeleteVery clever use of the pocket folders too!
Love both of your projects. I see that you had fun with the tag book. What a clever idea.
ReplyDeleteYour projects are so clever!
ReplyDeleteI loved this fold out book - may have to geta private lesson for my Budapest trip.
ReplyDeleteAbsolutely!
Deletefirst I love the tags- they scream HAPPY! 2nd- what a cute idea for file folders! Perfect for our little spring break road trip!!
ReplyDeleteThis comment has been removed by a blog administrator.
ReplyDeleteGreat post. I was checking constantly this blog and I'm impressed! Very useful info particularly the last part :) I care for such information a lot. I was looking for this particular information for a long time. Thank you and best of luck.
ReplyDeleteFeel free to surf to my site - woodworking tools
Rhonda how did i miss this post! A great tutorial, the fun folder file is a fantastic idea to keep all those bits together. Love how you structured the book.
ReplyDeleteIt's good to make something for fun too and i can see you had a great time with your tag book...it's adorable!
thank you too for leaving me a lovely comment x